26 March 2009

Attack Bike

I got a gift from Drazilek at the Sons of Seth today.

An attack bike!

Cheers Drazilek.

I eagerly unwrapped it and got my sprues.

Fairly simple, bike on one and side car and extras on the other.
I whipped the bike together then whacked on my biker.

I then glued the arms and whilst they were drying I pushed his hands onto the handlebars to ensure I dont get a repeat of what I call "ghost riding"....

I slapped together my sidecar but stopped before I put the biker on, I glued it to the main bike and I've paused at this stage.
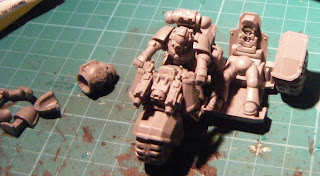
Brum brum, zoom ZOOM!

Ive paused to made it easier for myself to paint him. I think when I paint the bike, Ill paint my other attack bikes, repair them and aim to finish an entire Ravenwing Squadron at once.

I like bikes....

Today I pulled out the predator tank and had no idea where to start. After fruitless searches on the website I attempted to construct it using nothing but logic and a small cardboard clipping of how to construct the tank tracks from my box. I figured first I shall cut the tank wheelbases out as it was the most obvious. Where else to start but the bottom up.

Predator Sprue

I then stuck the two wheel bases together and looked at the little diagram I have to construct the tank tracks.

I then proceeded to stick the tank treads on.

The start of the treads.

To be truthful it was not that difficult, I glue the lot on and they quiet happily held on to one another without much effort. Just make sure you don't glue them in the wrong place!

Two completed treads

I was starting to get confident here and
decided to add the floor plate to give it structure. I glued the floor in place and decided I'd add the inside divider and display.

Feeling smug with myself here...

Rather proud I did it without too many errors...

WELL!
I sat there and remembered a friend who had his door at the back of the rhino
which opened easily. "hrmmmm" I mused...
I looked at the sprue and found the back door and saw how it would work...
I soon realised I'd made a minor mistake.
With a yelp I ripped it apart and slotted in the back door then re-glued it and held it together.
"shhh, shh, shhh" I whispered into its exhaust pipes whilst patting it affectionately "there, there".

I want to do detail and paint it properly so I'm going to base coat it and paint inside detail.
So for now that is all...

Babys got her back door...

Part 2 coming up soon....

I realised last night I only had one landspeeder assembled, so I found out my sprues and sighed, but thought why not show the process.

Land Speeder Sprue

As we can see it looks a fairly simple but alas it is not.
When gluing you have to sit and hold it tightly, but I figure another way.
Whilst I held my last one I leaned it against the table, hard, then I held it in my armpit.. which failed miserably. I finally settled on elas
tic bands.

Once the landspeeder is together and gluing elastic bands really work wonders.

First I played around with the main bulky parts and quickly remember how to construct the inside and base.

Landspeeder with floor plating and bulkhead to the lowerhull.

I then glued the base plate to the base of the speeder, and held it tightly to ensure it was a snug fit. For some reason the landspeeder just wants to come apart naturally.

Gluing floor plating to lower hull

Fairly easy huh, but I soon realised if I glued all this together I would get a repeat of my last landspeeder. massive spaces of unpainted grey inside. This time I'm prepared so I did a dry brushing technique on my cockpit and legs.

Dry brushing is where you get a fairly large brush, dip it in the paint but then remove a large amount of it so its almost a dry brush, hence... dry brushing.

I used this method to give my inside very basic look without hardly any effort. I will continue to dry brush my entire model before gluing anything else. As I am doing ravenwing my model will be black anyway.

Driver unglued in landspeeder with dashboard to adjust arms to correct position.

I then clipped my little guy (forgot to clean him up) and glued him together. I thought it was noteworthy that its advisable to paint the guys completely before you put them in the landspeeder. So As I dont want to then wreck him by accident I will be painting the entire model in steps before gluing.

After base coating

I plan to next paint the rest of the parts, add detail and glue it together then touch it up.

For now.